Transport hunt, a pair of batreps
So after the birth of the little monster, I'm getting back on the gaming wagon slowly. Cruel seas is supposedly inbound (edit:shipping notice received!) but the preorder is still awaiting and my Infinity painting queue is slowly getting smaller. My friend Ian and I decided to crack on with some BRS and get some table-time for our currently unused transports and recon craft and fancied a crack at the newly released "transport hunt" mission penned by Andy chambers and Ken Natt (available in the Ready Room facebook page file section and official Warlord forums).
It played out quite quickly due to awful dice so we ended up re-racking after the first attempt and swapping over intercept/escort roles.
The 500pt forces were:
Allies: x5 P51-D with R4/3/3/3/2 pilots (x2 PBY catalina recon craft)
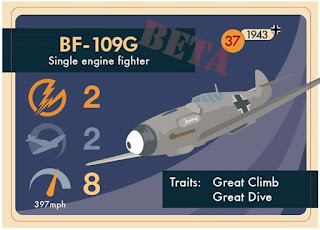
Axis: x6 BF109-G with R4/3/3/3/2/2 pilots (x3 ju52 transports) We used the beta card for this one to do a later war scenario.
The mission is written quite loosely with no real specifics on pilot skills or numbers of transports to use, so we plumped for R3 pilots for the transport craft and dumped down whatever we had in our cases/shelves and set to it!
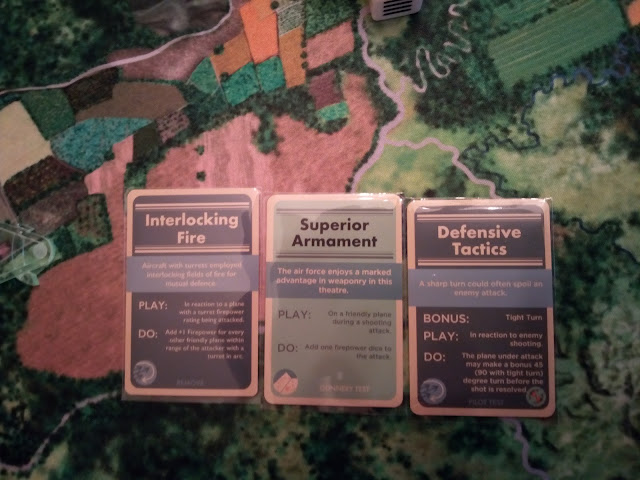
For my cards (allies) I went with high altitude performance and poorly trained opponents, plus the generic option of clear skies to try and deny enemy transports too much hiding opportunity.
He also had High altitude performance, heavy flak presence (must have been a ship just off the board edge or something lol) and something else that didn't make any impact as i've not written it down or remembered it!
Game one: pass one
German escorts deploy centrally, with an element of P51's opposing them to their 10 o'clock behind a bank of cloud. my high cover markers are to the 12 o'clock of the 109Gs.
Ive already removed two of the banks of cloud from the central area and my R4 and R3 pilots start advantaged. His pair of 3's are advantaged and neutral. He has high cover elements on both flanks.
Sensing an opportunity, I great dive my R4 pilot in, using his superior skill and proximity to knock the advantaged plane to neutral. My R3 pilot then max-moves to cover his 6 and uses his pilot skill to "search" and successfully triggers the arrival of 2 Ju52's, as near to the clouds as you could get without being in them, basically guaranteeing them a turn of safety from attack and getting a free bump to neutral to give them extra resilience.
His R3s move up and attempt to cover off angles for my soon-to arrive high cover element.
High cover piled in now 2 of the three targets had arrived and the mustangs were ready to pounce.
Pass 2
My advantaged 3 on the far right senses an opportunity for a quick kill via tailing, knowing full well its a risk because of the high cover element (obscured by the transports in this pic) if they have any great dive cards in-hand. Deciding to go for it, he burns to turn and gets onto the 6 of the advantaged R3 leftmost above, promptly whiffing his shots with awful dice and gaining little as his arse is now exposed. With the pressure off in the central section, his remaining advantaged R3 pilot burns to turn (B2T) and promptly splashes my R4 in another showing of awful dice. We've hardly got going and I've already used 2 of my 3 deep pockets and lost my best pilot. Not going well here....
My High cover element heads over to intercept the bombers next turn when they break cloud cover, trying to play the objective rather than get stuck in a furball in the centre.
Turns out he did have great dive in-hand, using it to spectacularly tail and splash my utterly useless R3 who whiffs yet another roll (not getting above a 4) and uses my last deep pockets card.
Its now looking unwinnable as I'm vastly outnumbered and the triple engine transports have been bumped up to neutral for free making them even more resilient!
His disadvatnaged 109 (now free of its tailing mustang) attempts to climb but is promptly shut down by "poorly trained opponents" as I didn't want him looping round to tail my element from high cover. His remaining HC element deploys on my left flank.
Pass 3
Given I needed to get stuck in and fast, I commit my last element with great dive cards to open up on the bomber. Again, awful luck strikes as he dodges the deflection shot I critically succeeded on :-(
We repeat with the second one, knocking it down to disadvantaged this time, but the plucky gunner returns fire and knocks my guy down to disad! I'm seriously considering melting dice at this point. I'm at my bug out threshold and my rookie cant escape from the western high cover element or the swarm around the bombers. He moves up to provide some wingman effect, using poorly trained opponents to ward off one attack but is shot to pieces by the other plane and the game ends as my tattered remnants disengage and head for home.
Review of game one:
I played for a bit of an alpha strike, trying to get some early kills to get the escorts to bug out and leave me with the transports. As my dice were totally uncooperative with the plan, none of that happened and I got roundly outnumbered and smashed to bits.
I'd read and re-read the mission rules and found them pretty vague, there is nothing stating facings/directions for the transports, so there is nothing stopping them from appearing in cloud, going neutral for free and then diving for the 6" to automatically leave the board in the disadvantaged pass when everything else has already gone. It seems very loosely written and needs some clarification about whether the transports have a designated board edge to leave from, whether they get the free cloud boost to neutral and if so, can they use it by diving.
Anywho... as that dice-debacle only took 20mins or so to play out, we re-racked and had another go, this time with my americans as the escort for some PBY catalinas i've never actually used yet.
Game 2: pass 1
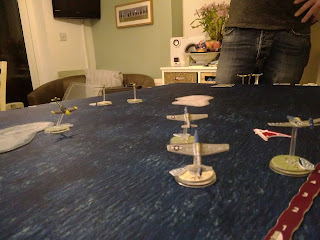
 My high cover go on my western flank, just behind the 109's pictured to keep some pressure on them in a pincer. He then pressures me by putting his high cover element on the same flank but nearer his edge. As you can see in the picture, I ended up with a slightly better roll for advantage and I'd not used my clear skies card as I wanted more cover for the PBY's. The advantaged pass went straight to neutral pass and my threes all min-move, turn and climb. His pass with the 109's included an attempt to dive and climb back up, but poorly trained opponents prevents the climb and leaves him stranded as pictured. The other two planes min-move and climb to neutral.
High cover arrives and the western flank gets pretty heavy pretty quickly
Pass 2
My R4 opens proceedings with a burn to turn and takes the orphaned 109G on in a head to head, hoping for a splash. He critically hits but is subsequently dodged. My R3 wingman goes and "High altitude performance" is used to knock one of the central 109's down a peg to disad, ready for the high cover to finish them off.
All looks good for the escorts here until we open up with the R3 and whiff both his attempts at deflection shots. His rookie companion chits both times however and my opponent is now sitting on 3 boom chits. Desperate for some pay-off, his high cover element plays me at my own game and High Altitude performance gets played with bonus cards to knock him down to disadvantaged ready for a pounce next pass. The rearmost 109 uses his pilot action to search and fails. The orphaned R3 who narrowly avoided a rendevous with the sea then ends the pass by moving through my planes and climbing to neutral, leaving his 6 relatively exposed.
Pass 3
The mass of planes ends up so dense with angles that I run out of tailing opportunities thanks to wingman effect so with a hand full of deep pockets cards, I take a bit of a risk and engage in some rookie bullying and go for a head-to-head shot knowing my 6 is well covered. I succeed in knocking him down to disad and deep-pockets the return fire, dodging successfully and retaining advantage.
My high cover element get thoroughly out performed in high altitude by the 109s and repeated attempts with bonus cards get my guys bullied down to disadvantaged by his high cover element as they move by.
The orphaned 109 meets his doom as the R4 that opened proceedings with the head-to-head bounces into and out of the cloud with a burn to turn and effortlessly ends on his six but just can't get the .50s on target as he jinks desperately to avoid the tracer!
Desperation starts to set in as he's approaching chit threshold and there are still no transports to shoot at, so his R4 (neutral, mid picture) boots it away from the furball and promptly fails his search action, leaving some potential tailing options on him...
As the neutral pass begins, my R3 in cloud takes the opportunity to get straight onto his 6 and splashes him effortlessly effectively wrapping up the game as he's now at threshold.
Feeling risky, I engage in some head-to head rolls in the ensuing north-western corner furball and a good hit and subsequent deep-pockets of the return fire puts him over the threshold and effectively ends the game.
Out of principle, his last actions do finally reveal the hiding place of the sneaky Catalinas but its too late to do anything about them as the 109s head for home
On the whole, I think its a fun scenario but I really think it needs tightening up with guidance on transport's facing, pilot ratings and actual numbers to deploy as well as intended direction of travel to escape. If you can freely put veteran or ace crew into a 3 or 4 engined transport like a ju52, H8K or H6K which then does get a cloud bump to neutral, there's no hope in hell of ever getting that shot down before it makes the 9" or so off the nearest board edge.
Some clarity about how transport planes behave relative to bombers and such would be great (for example do they class as "laden" for the purposes of speed/turning), can they be tailed etc would be much appreciated as I can see multiple readings being possible which isn't ideal mid-game.
That said, getting transports on the board has been most refreshing and I love the core idea of the mission and look forward to seeing how this one evolves over time,
Thanks for reading!
It played out quite quickly due to awful dice so we ended up re-racking after the first attempt and swapping over intercept/escort roles.
The 500pt forces were:
Allies: x5 P51-D with R4/3/3/3/2 pilots (x2 PBY catalina recon craft)
Axis: x6 BF109-G with R4/3/3/3/2/2 pilots (x3 ju52 transports) We used the beta card for this one to do a later war scenario.
The mission is written quite loosely with no real specifics on pilot skills or numbers of transports to use, so we plumped for R3 pilots for the transport craft and dumped down whatever we had in our cases/shelves and set to it!
For my cards (allies) I went with high altitude performance and poorly trained opponents, plus the generic option of clear skies to try and deny enemy transports too much hiding opportunity.
He also had High altitude performance, heavy flak presence (must have been a ship just off the board edge or something lol) and something else that didn't make any impact as i've not written it down or remembered it!
Game one: pass one
German escorts deploy centrally, with an element of P51's opposing them to their 10 o'clock behind a bank of cloud. my high cover markers are to the 12 o'clock of the 109Gs.
Ive already removed two of the banks of cloud from the central area and my R4 and R3 pilots start advantaged. His pair of 3's are advantaged and neutral. He has high cover elements on both flanks.
Sensing an opportunity, I great dive my R4 pilot in, using his superior skill and proximity to knock the advantaged plane to neutral. My R3 pilot then max-moves to cover his 6 and uses his pilot skill to "search" and successfully triggers the arrival of 2 Ju52's, as near to the clouds as you could get without being in them, basically guaranteeing them a turn of safety from attack and getting a free bump to neutral to give them extra resilience.
His R3s move up and attempt to cover off angles for my soon-to arrive high cover element.
Through a break in the clouds Hank saw them, lumbering giants, yellow identifiers caught against the ashen sea far below. "We got em boys, flying low and slow to my 2 o'clock, give 'em hell!"In the disadvantaged pass, the bombers move up, the front runner making the cloud (getting the bump to neutral) and the rear runner just shy.
High cover piled in now 2 of the three targets had arrived and the mustangs were ready to pounce.
 |
| The cavalry arrive! |
Pass 2
My advantaged 3 on the far right senses an opportunity for a quick kill via tailing, knowing full well its a risk because of the high cover element (obscured by the transports in this pic) if they have any great dive cards in-hand. Deciding to go for it, he burns to turn and gets onto the 6 of the advantaged R3 leftmost above, promptly whiffing his shots with awful dice and gaining little as his arse is now exposed. With the pressure off in the central section, his remaining advantaged R3 pilot burns to turn (B2T) and promptly splashes my R4 in another showing of awful dice. We've hardly got going and I've already used 2 of my 3 deep pockets and lost my best pilot. Not going well here....
My High cover element heads over to intercept the bombers next turn when they break cloud cover, trying to play the objective rather than get stuck in a furball in the centre.
Turns out he did have great dive in-hand, using it to spectacularly tail and splash my utterly useless R3 who whiffs yet another roll (not getting above a 4) and uses my last deep pockets card.
Its now looking unwinnable as I'm vastly outnumbered and the triple engine transports have been bumped up to neutral for free making them even more resilient!
His disadvatnaged 109 (now free of its tailing mustang) attempts to climb but is promptly shut down by "poorly trained opponents" as I didn't want him looping round to tail my element from high cover. His remaining HC element deploys on my left flank.
Pass 3
Given I needed to get stuck in and fast, I commit my last element with great dive cards to open up on the bomber. Again, awful luck strikes as he dodges the deflection shot I critically succeeded on :-(
We repeat with the second one, knocking it down to disadvantaged this time, but the plucky gunner returns fire and knocks my guy down to disad! I'm seriously considering melting dice at this point. I'm at my bug out threshold and my rookie cant escape from the western high cover element or the swarm around the bombers. He moves up to provide some wingman effect, using poorly trained opponents to ward off one attack but is shot to pieces by the other plane and the game ends as my tattered remnants disengage and head for home.
Review of game one:
I played for a bit of an alpha strike, trying to get some early kills to get the escorts to bug out and leave me with the transports. As my dice were totally uncooperative with the plan, none of that happened and I got roundly outnumbered and smashed to bits.
I'd read and re-read the mission rules and found them pretty vague, there is nothing stating facings/directions for the transports, so there is nothing stopping them from appearing in cloud, going neutral for free and then diving for the 6" to automatically leave the board in the disadvantaged pass when everything else has already gone. It seems very loosely written and needs some clarification about whether the transports have a designated board edge to leave from, whether they get the free cloud boost to neutral and if so, can they use it by diving.
Anywho... as that dice-debacle only took 20mins or so to play out, we re-racked and had another go, this time with my americans as the escort for some PBY catalinas i've never actually used yet.
Game 2: pass 1
 |
| Deployment for game two, my first element of p51s |
 My high cover go on my western flank, just behind the 109's pictured to keep some pressure on them in a pincer. He then pressures me by putting his high cover element on the same flank but nearer his edge. As you can see in the picture, I ended up with a slightly better roll for advantage and I'd not used my clear skies card as I wanted more cover for the PBY's. The advantaged pass went straight to neutral pass and my threes all min-move, turn and climb. His pass with the 109's included an attempt to dive and climb back up, but poorly trained opponents prevents the climb and leaves him stranded as pictured. The other two planes min-move and climb to neutral.
High cover arrives and the western flank gets pretty heavy pretty quickly
Pass 2
My R4 opens proceedings with a burn to turn and takes the orphaned 109G on in a head to head, hoping for a splash. He critically hits but is subsequently dodged. My R3 wingman goes and "High altitude performance" is used to knock one of the central 109's down a peg to disad, ready for the high cover to finish them off.
 |
| Free deflection shots abound! a 109 is about to go disad to HAP card |
Pass 3
The mass of planes ends up so dense with angles that I run out of tailing opportunities thanks to wingman effect so with a hand full of deep pockets cards, I take a bit of a risk and engage in some rookie bullying and go for a head-to-head shot knowing my 6 is well covered. I succeed in knocking him down to disad and deep-pockets the return fire, dodging successfully and retaining advantage.
My high cover element get thoroughly out performed in high altitude by the 109s and repeated attempts with bonus cards get my guys bullied down to disadvantaged by his high cover element as they move by.
The orphaned 109 meets his doom as the R4 that opened proceedings with the head-to-head bounces into and out of the cloud with a burn to turn and effortlessly ends on his six but just can't get the .50s on target as he jinks desperately to avoid the tracer!
Desperation starts to set in as he's approaching chit threshold and there are still no transports to shoot at, so his R4 (neutral, mid picture) boots it away from the furball and promptly fails his search action, leaving some potential tailing options on him...
As the neutral pass begins, my R3 in cloud takes the opportunity to get straight onto his 6 and splashes him effortlessly effectively wrapping up the game as he's now at threshold.
Feeling risky, I engage in some head-to head rolls in the ensuing north-western corner furball and a good hit and subsequent deep-pockets of the return fire puts him over the threshold and effectively ends the game.
Out of principle, his last actions do finally reveal the hiding place of the sneaky Catalinas but its too late to do anything about them as the 109s head for home
 |
| We were here all along dumpkopf!! |
Some clarity about how transport planes behave relative to bombers and such would be great (for example do they class as "laden" for the purposes of speed/turning), can they be tailed etc would be much appreciated as I can see multiple readings being possible which isn't ideal mid-game.
That said, getting transports on the board has been most refreshing and I love the core idea of the mission and look forward to seeing how this one evolves over time,
Thanks for reading!


Comments
Post a Comment